
☁ Learning to deploy Kubernetes in Azure (2/2)
Hello again!
This post is the continuation of Learning to deploy Kubernetes in Azure (1/2) in which we deploy the necessary resources to use Kubernetes in Azure, if you have not seen this entry which I encourage anybody to read it.
In this post we will learn how to deploy a Kubernetes dashboard to be able to manage it correctly.
The first part will be to open the command console. We open our Azure portal and click on the icon in the upper right.

As it’s not the first time we open it, there is no need to select which subscription will work on, but we will have to take out the credentials of the resource group that we have created previously.
az aks get-credentials –resource-group Kubernetes –name aks-91

Once we have the credentials we go on to create the dashboard:
kubectl create clusterrolebinding kubernetes-dashboard –clusterrole=cluster-admin –serviceaccount=kube-system:kubernetes-dashboard

We create the tunnel that allows us to access the dashboard. In this command we have to configure the name of the resource group, the name of the AKS service and the subscription.
az aks browse –resource-group Kubernetes –name aks-91 –subscription “NombreDeTuSuscripción”

When executing the command, it will open a new window in the browser.
As we have not displayed any images about our service, nothing appears yet. Later we will work with the dashboard.
In the next point we will deploy MySQL and WordPress. For the deployment of the images we must stay in the command console.
We need to create a secret for the MySQL container.
kubectl create secret generic mysql-pass –from-literal=password=”password” -n default

We download the default images from the Kubernetes repository.
curl -LO https://k8s.io/examples/application/wordpress/mysql-deployment.yaml
curl -LO https://k8s.io/examples/application/wordpress/wordpress-deployment.yaml

Now we will deploy the wordpress containers. I have used an official wordpress image, but I have modified it to create 3 persistent volumes and 3 containers linked to them. You have to change the files to link the secret to the files we have created.
nano wordpress-deployment.yaml
We will have to add the name of the secret we created previously.
secretKeyRef:
name: mysql-pass
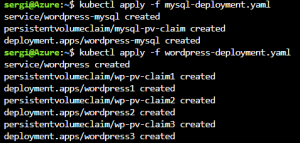
Now we display the files that are the ones that will create the containers.
kubectl apply -f mysql-deployment.yaml
kubectl apply -f wordpress-deployment.yaml
We must check if what we have done so far is well done, so first we will check the secret we have created.
kubectl get secrets
Now we check the pods.
kubectl get pods
Finally, we check the wordpress service.
kubectl get services wordpress

We will enter the external IP that Azure has given us to install WordPress in our Kubernetes cluster. Now we install the WordPress service.
Once installed we return to the Kubernetes dashboard with the command:
az aks browse –resource-group Kubernetes –name aks-91 –subscription “NombreDeTuSuscripción”
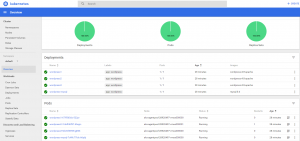
Now we can see the number of containers we have and their names. We already have our service available and with high availability.
Stay tuned to the blog because we will soon publish a proof of concept and new posts about SQL, Azure and Power BI.

Database Administrator. Centrado en la monitorización y el rendimiento de las bases de datos.
