🚦 Managing access and use of data with SQL Server – GDPR Series (3/5)

Once we have discovered and classified our data, we enter the second step on our way to comply with the GDPR, now it is the turn to manage access to the data and control the use that is made of them.
Why is this important for the GDPR?
The GDPR specifically addresses the need for mechanisms which limit access to data, requiring “measures [that] shall ensure that by default personal data are not made accessible without the individual’s intervention to an indefinite number of natural persons.”
GDPR Article 25(2)—“Data protection by design and by default.”
SQL Server has several tools for access control, but it is the SQL Server administrator who makes use of them, and in many cases for convenience, it grants unnecessary permissions to certain users, giving access to data that this user should not be able to see or confidential data.
To help with the management of these accesses and control the data that can be viewed, SQL Server offers the following:
- Authentication mechanisms to ensure that only users with valid credentials can access the database server. SQL Server supports SQL Server authentication and authentication with integrated Windows security, and in Azure environment, for Azure SQL Database and Azure SQL Data Warehouse, access control by Azure Active Directory roles.
- Access control based on roles, granting users different roles (access levels) depending on their role within the team.
- Row-Level security to avoid access to specific rows of a table based on the characteristics of the user who tries to access the data, for example that in the employee table you can only see your data and not those of other employees.
- Use of data masking, for example for bank account numbers of type XXXX-XXXX-XXXX-1321, to hide data to users who do not have permissions using Dynamic Data Masking.
- Verify the changes that occur in a table using SQL Server Audit or for Azure SQL Database using Azure SQL Server Auditing.
In this post we will focus on the newest features, available from SQL Server 2016, such as Row-Level Security and Dynamic Data Masking.
Row-Level Security
For our example, we are going to use the AdventureWorks2016 database, specifically the [Sales]. [SalesTerritory] and [Sales]. [Customer] tables.
USE [AdventureWorks2016]
GO
-- [Sales].[SalesTerritory]
SELECT TerritoryID
	,NAME
	,CountryRegionCode
	,[Group]
FROM [Sales].[SalesTerritory]

-- [Sales].[Customer]
SELECT CustomerID
	,PersonId
	,StoreId
	,TerritoryID
	,AccountNumber
FROM [Sales].[Customer]
When executing the queries you can see how each Customer in the [Sales].[Customer] belongs to a Territory.
[Sales].[SalesTerritory]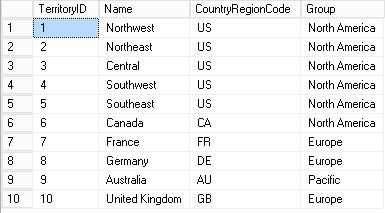
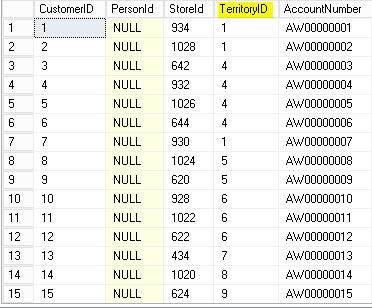
In our example we are going to use Row-Level Security to control that only the users that belong to a Territory can see the Customers that corresponds to them.
We proceed to create the users:
-- USERS creation
USE [AdventureWorks2016]
GO
CREATE USER USCountryManager WITHOUT LOGIN;
GO
CREATE USER GBCountryManager WITHOUT LOGIN;
GO
CREATE USER DECountryManager WITHOUT LOGIN;
GO
CREATE USER FRCountryManager WITHOUT LOGIN;
GO
CREATE USER CACountryManager WITHOUT LOGIN;
GO
CREATE USER AUCountryManager WITHOUT LOGIN;
We grant these users permissions:
-- Datareader permissions to the CountryManagers
USE [AdventureWorks2016]
GO
ALTER ROLE [db_datareader] ADD MEMBER USCountryManager
ALTER ROLE [db_datareader] ADD MEMBER GBCountryManager
ALTER ROLE [db_datareader] ADD MEMBER DECountryManager
ALTER ROLE [db_datareader] ADD MEMBER FRCountryManager
ALTER ROLE [db_datareader] ADD MEMBER CACountryManager
ALTER ROLE [db_datareader] ADD MEMBER AUCountryManager
And the next step would be to create the Row Level Security, in our case we will first create a schema to have it more organized:
-- Schema Creation
USE [AdventureWorks2016]
GO
CREATE SCHEMA GDPR;
The next thing is to create a function on [Sales]. [SalesTerritory] that we will later use to filter [Sales]. [Customer].
This function is responsible for validating whether or not the user will be able to see a certain row based on the TerritoryId and later on the CountryRegionCode
-- Function Creation
USE [AdventureWorks2016]
GO
CREATE FUNCTION GDPR.CountryValidation(@TerritoryID AS INT)
RETURNS TABLE
WITH SCHEMABINDING
AS
RETURN SELECT 1 AS ValidationResult FROM [Sales].[SalesTerritory] G
WHERE
G.TerritoryID = @TerritoryID AND
(
 (
    G.CountryRegionCode = 'US' AND USER_NAME() = 'USCountryManager'
  )
  OR
 (
    G.CountryRegionCode = 'GB' AND USER_NAME() = 'GBCountryManager'
 )
  OR
 (
     G.CountryRegionCode = 'DE' AND USER_NAME() = 'DECountryManager'
 )
  OR
  (
     G.CountryRegionCode = 'FR' AND USER_NAME() = 'FRCountryManager'
   )
  OR
   (
     G.CountryRegionCode = 'CA' AND USER_NAME() = 'CACountryManager'
   )
  OR
  (
    G.CountryRegionCode = 'AU' AND USER_NAME() = 'AUCountryManager'
  )
)
Once we have created the function, we will create a Security Policy that will use this function to filter the table [Sales]. [Customer]
-- Security Policy Creation to filter data from Customer table
USE [AdventureWorks2016]
GO
CREATE SECURITY POLICY GDPR.AWSecurityPolicy
ADD FILTER PREDICATE GDPR.CountryValidation(TerritoryId) ON [Sales].[Customer]
Now that we have everything created, we will perform a series of tests to better understand how it works.
DBO User
First, we try to execute it with the user with whom we have created everything, in our case it is a user with dbo permissions
-- SELECT with DBO USER
USE [AdventureWorks2016]
GO
SELECT * FROM [Sales].[Customer]

It does not return any results, and it is correct because our user is not included in the function.
USCountryManager User
Now we are going to perform the same test but using the USCountryManager user that is in the function, we will use “EXECUTE AS USER” for it:
-- SELECT WITH USCountryManager USER
USE [AdventureWorks2016]
GO
EXECUTE AS USER='USCountryManager'
	SELECT * FROM [Sales].[Customer]
REVERT
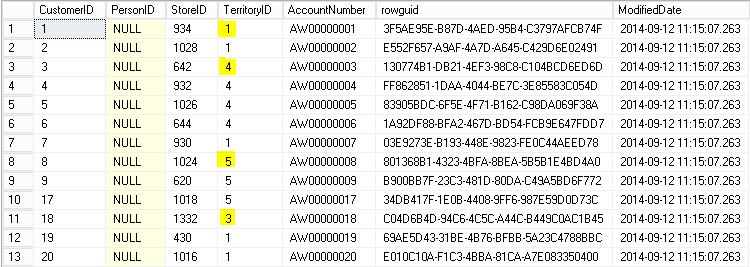
We see that there are results, and that several TerritoryId appear, this is normal since “US” has several territories:
-- More than 1 Territory, why?
USE [AdventureWorks2016]
GO
SELECT TerritoryID
	,NAME
	,CountryRegionCode
	,[Group]
FROM [Sales].[SalesTerritory]
WHERE CountryRegionCode = 'US'

GBCountryManager User
The last test will be done with the GBCountryManager user, who only has one Territory
-- SELECT WITH GBCountryManager USER
USE [AdventureWorks2016]
GO
EXECUTE AS USER='GBCountryManager'
	SELECT * FROM [Sales].[Customer]
REVERT
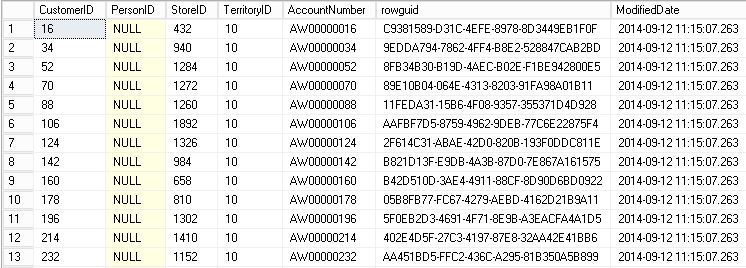
Finally and if we wanted to delete everything and leave it as in the beginning, we would only have to execute the following:
-- Drop RLS Security Policy
DROP SECURITY POLICY GDPR.AWSecurityPolicy

-- DROP RLS Function
DROP FUNCTION GDPR.CountryValidation
Once we have understood how Row-Level Security works and how the data is filtered, we will move on to use the Dynamic Data Masking functionality to mask data.
Dynamic Data Masking
The first thing to know about Dynamic Data Masking is that the masking is done at execution time, that is, the data in the table is not masked.
To control whether a user can see a masked data or not, SQL Server uses the “UNMASK” permission.
In this example we are going to show the masking types DEFAULT, EMAIL and PARTIAL.
We are going to use two users, the DBA user who will have UNMASK permissions, and the Developer user who will not have UNMASK permissions
We start by creating the users
-- User creation
USE [AdventureWorks2016]
GO
CREATE USER DBA WITHOUT LOGIN;
GO
CREATE USER Developer WITHOUT LOGIN;
We give these users permissions:
-- Datareader permissions
USE [AdventureWorks2016]
GO
ALTER ROLE [db_datareader] ADD MEMBER DBA
ALTER ROLE [db_datareader] ADD MEMBER Developer
And we grant the UNMASK permission to DBA user
-- UNMASK permission to DBA
USE [AdventureWorks2016]
GO
GRANT UNMASK TO DBA
Now that we have the users with the appropriate permissions, we can see the types of masking and how they apply to the data, for this we will use again the AdventureWorks2016 database
DEFAULT masking
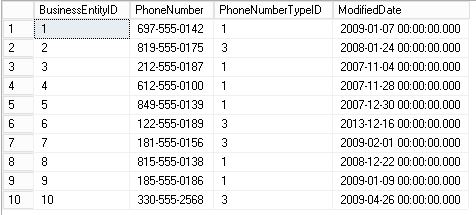
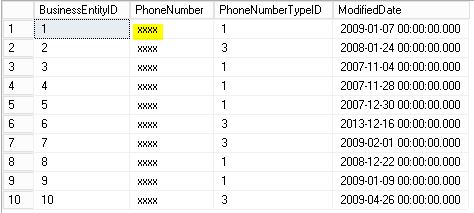
This function replaces the columns of type string with the string “XXXX” and those of the numeric type with “0”.
Let’s use it on the PhoneNumber column of the Person.PersonPhone table
-- MASK PhoneNumber column using DEFAULT() function
USE [AdventureWorks2016]
GO
ALTER TABLE Person.PersonPhone
ALTER COLUMN PhoneNumber ADD MASKED WITH (FUNCTION = 'default()')
And we’re going to run a TOP 10 on the table using the DBA and Developer users to see the difference in the visualization
USE [AdventureWorks2016]
GO
-- SELECT Person.PersonPhone table with DBA USER
EXECUTE AS USER='DBA'
	SELECT TOP 10 * FROM Person.PersonPhone
REVERT

-- SELECT Person.PersonPhone table with Developer USER
EXECUTE AS USER='Developer'
	SELECT TOP 10 * FROM Person.PersonPhone
REVERT
DBA user (with UNMASK permission)
Developer User
EMAIL masking
This function replaces the part before the @ with the first letter and “XXXX” and puts “@ XXXX.com” at the end
We’re going to use it on the EmailAddress column of the Person.EmailAddress table
-- MASK EmailAddress column using EMAIL() function
USE [AdventureWorks2016]
GO
ALTER TABLE Person.EmailAddress
ALTER COLUMN EmailAddress ADD MASKED WITH (FUNCTION = 'email()')
And we’re going to run a TOP 10 on the table using the DBA and Developer users to see the difference in the visualization
USE [AdventureWorks2016]
GO
-- SELECT Person.EmailAddress table with DBA USER
EXECUTE AS USER='DBA'
	SELECT TOP 10 * FROM Person.EmailAddress
REVERT

-- SELECT Person.EmailAddress table with Developer USER
EXECUTE AS USER='Developer'
	SELECT TOP 10 * FROM Person.EmailAddress
REVERT
DBA user (with UNMASK permission)

Developer User

PARTIAL masking
This function defines a number of characters at the beginning and at the end that will remain unmasked, and in the middle will use the string that is chosen.
We are going to use it on the column LastName of the Person.Person table, we will leave a character at the beginning and two at the end without masking and in the middle we will put the text “GDPR”.
-- MASK LastName column using PARTIAL() function
USE [AdventureWorks2016]
GO
ALTER TABLE Person.Person
ALTER COLUMN LastName ADD MASKED WITH (FUNCTION = 'partial(1, "GDPR", 2)')
And we’re going to run a TOP 10 on the table using the DBA and Developer users to see the difference in the visualizationTransact-SQL
USE [AdventureWorks2016]
GO
-- SELECT Person.Person table with DBA USER
EXECUTE AS USER='DBA'
	SELECT TOP 10 * FROM Person.Person
REVERT

-- SELECT Person.Person table with Developer USER
EXECUTE AS USER='Developer'
	SELECT TOP 10 * FROM Person.Person
REVERT
DBA user (with UNMASK permission)

Developer User

To finish we will see how quickly we can reverse all the changes made.
We revoke the UNMASK permission to the DBA user
-- Remove UNMASK permission to DBA
USE [AdventureWorks2016]
GO
REVOKE UNMASK TO DBA
And we cleared the masking in the three tables that we used
-- DROP MASK
USE [AdventureWorks2016]
GO
ALTER TABLE Person.PersonPhone
ALTER COLUMN PhoneNumber DROP MASKED;
GO
ALTER TABLE Person.EmailAddress
ALTER COLUMN EmailAddress DROP MASKED;
GO
ALTER TABLE Person.Person
ALTER COLUMN LastName DROP MASKED;
Now that we know how to control the access and visibility of the data, it is time to go to the next point of the GDPR and see how to Protect this data.
GDPR Series:
- How to adapt SQL Server to the GDPR
- Discovering and classifying personal data with SQL Server
- Managing access and use of data with SQL Server
- Protecting data at Rest, in Use and in Transit
- Monitor and Report unauthorized access to Personal Data

Consultor Senior SQL Server & BI con 9 años de experiencia, MCSE Data Platform con conocimientos de toda la herramienta y enfocado principalmente a la detección y mejora de problemas de rendimiento en Base de Datos. En mi tiempo libre soy un gran aficionado a la fotografía de estilo urbano y de lugares abandonados.

