
🔍 Discovering and classifying personal data with SQL Server – GDPR Series (2/5)

The first step to comply with the GDPR is to evaluate if this applies to your organization and if so, what data should be adjusted to meet it. To perform this analysis, it is necessary to know what data you have and where they are located. Having a data classification scheme can help answer requests for access to personal data in a faster and more controlled way.
SQL Server has several tools that can help you discover and classify this personal data:
- You can execute queries to system tables and metadata to quickly identify if a column has personal data or not.
- If you have free text fields, such as the typical “Observations”, you can use Full-Text Search to find personal data.
- We can use the Extended Properties feature to tag and add a description to fields or tables that contain personal data. As of version 17.5 of SQL Server Management Studio, a functionality has been added that will help us to carry out this classification in a very easy way.
Discover
The best way to detect which columns can contain personal information is to have a good documentation of the database to know in a fast way the tables that are involved, unfortunately we are in the real world and 90% of the time this documentation does not exist or it is obsolete, so here comes SQL Server and its sys.columns table to help us.
If you did not know the sys.columns table, a quick description would be “It is a system table that holds information about all the columns of the objects in a database, such as tables or views”, if you need more information, here you have the link to the official documentation sys.columns (Transact-SQL).
For example, to be able to know all the columns of a database that contain the word “name” we could execute the following query:
SELECT object_name(object_id) AS TableName,
		Name as ColumnName
FROM sys.columns
WHERE name LIKE '%name%'
From this, we have created a small script that starts with a temporary table as a dictionary in which we will put all the words we want to search (in this case, candidate words to host personal information) and then using cursors will search for those words in all the database and save it in another temporary table that will be displayed at the end.
It is important to note that in the script you can add new words you want to search, no matter if they are uppercase or lowercase or with or without accents, it will find them.
/*--------------------------------------------------------------------------------------
-- Title: Using sys.columns to discover columns that hold personal data - GDPR
-- Author: Fran Lens - Aleson ITC (https://aleson-itc.com)
-- Date: 2018-06-22
-- Description: This script will help us discover columns that may contain personal data, by default
                look for a few candidate words in Spanish and English, but you can add the ones you want.
                You can put the words in uppercase or lowercase or with or without accents, it will find them.
--------------------------------------------------------------------------------------*/

-- Variable declarations
DECLARE @DatabaseName nvarchar(100)
		, @Word nvarchar(50)
		, @SQL nvarchar(max)

-- Delete the #Words table if it exists
IF OBJECT_ID('tempdb.dbo.#Words', 'U') IS NOT NULL
DROP TABLE #Words;

-- Delete the table #DiscoverGDPR if it exists
IF OBJECT_ID('tempdb.dbo.#DiscoverGDPR', 'U') IS NOT NULL
DROP TABLE #DiscoverGDPR;

-- Creation of table #Words
CREATE TABLE #Words (word nvarchar(50))

-- Creation of table #DiscoverGDPR
CREATE TABLE #DiscoverGDPR (DatabaseName nvarchar(100), SchemaName nvarchar(100), TableName nvarchar(100), ColumnName nvarchar(100))

-- Insert words to search in the table #Words
INSERT INTO #Words VALUES
-- Spanish
('Nombre')
,('Apellido')
,('Tel') -- Aquí cogería valores como Telefono y abreviaturas
,('Tfno')
,('Direccion')
,('Poblacion')
,('Ciudad')
,('Pais')
,('Postal') -- Aquí cogería valores como CodigoPostal, DireccionPostal, DestinoPostal
,('CP')
,('Nac') -- Aquí cogería valores como Nacionalidad, FechaNacimiento, LugarNacimiento
,('DNI')
,('CIF')
,('NIE')
,('Pasaporte')
,('Identifi')
,('Mail') -- Aquí cogería valores como Mail, Email, Correo Mail
,('Correo') -- Aquí cogería valores como Correo, CorreoElectronico
,('Foto') -- Aquí cogería valores como Foto, Fotografia
,('Banco')
,('Tarjeta')
,('Cuenta')
,('Numero') -- Aquí cogería valores como NumeroCuenta, NumeroTelefono
,('IP')

-- English (Some Spanish terms are also valid, such as Postal or Identifi)
,('Name')
,('Surname')
,('Phone') -- Values like Phone, PhoneNumber, Cellphone
,('Mobile')
,('Cell')
,('Celular')
,('Address')
,('City')
,('Country')
,('ZIP')
,('Code')
,('Birthday')
,('Passport')
,('Photo')
,('Bank')
,('Card')
,('Account')
,('Number')
,('IP')

-- We create a cursor with the Databases in which we want to find the information
DECLARE db_cursor CURSOR
FOR

	SELECT	name
	FROM	master.sys.databases
	WHERE name NOT IN ('master', 'model', 'msdb', 'tempdb', 'distribution');

-- We start cursor db_cursor
OPEN db_cursor

-- Advance db_cursor
FETCH NEXT FROM db_cursor INTO @DatabaseName;

-- Loop db_cursor
WHILE @@FETCH_STATUS = 0
BEGIN

-- We create a cursor that travels the table #Words
DECLARE Word_Cursor CURSOR FOR
SELECT * FROM #Words

-- We start cursor Word_Cursor
OPEN Word_Cursor

-- Advance Word_Cursor
FETCH NEXT FROM Word_Cursor INTO @Word

-- Loop Word_Cursor
WHILE @@FETCH_STATUS = 0
BEGIN

	-- Creating the query
	SET @SQL =	'USE ' + @DatabaseName + ';' +

				'INSERT INTO #DiscoverGDPR ' +
				'SELECT	''' + @DatabaseName + ''' AS [database], ' +
				'		SCHEMA_NAME(schema_id) AS [schema],  ' +
				'		t.name AS table_name, c.name AS column_name ' +
				'FROM	sys.tables AS t ' +
				'INNER JOIN sys.columns c ON t.OBJECT_ID = c.OBJECT_ID ' +
				'WHERE	c.name LIKE ''%'+ @Word +'%'' COLLATE SQL_Latin1_General_CP1_CI_AI'

	-- Executing query
	EXEC sp_executesql @SQL

-- Advance Word_Cursor
FETCH NEXT FROM Word_Cursor INTO @Word

END

-- Close and delete cursor Word_Cursor
CLOSE Word_Cursor
DEALLOCATE Word_Cursor

-- Advance db_cursor
FETCH NEXT FROM db_cursor INTO @DatabaseName;

END

-- Close and delete cursor db_cursor
CLOSE db_cursor;
DEALLOCATE db_cursor;

-- Showing the data
SELECT *
FROM #DiscoverGDPR
ORDER BY DatabaseName, SchemaName, TableName, ColumnName
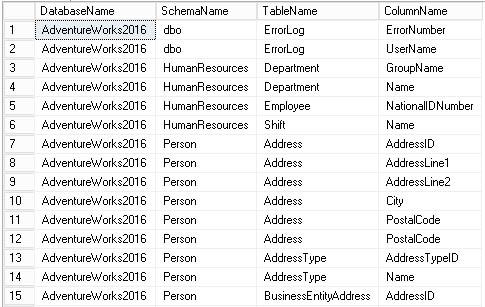
Here we can see the results that the AdventureWorks2016 database would return:
Classify
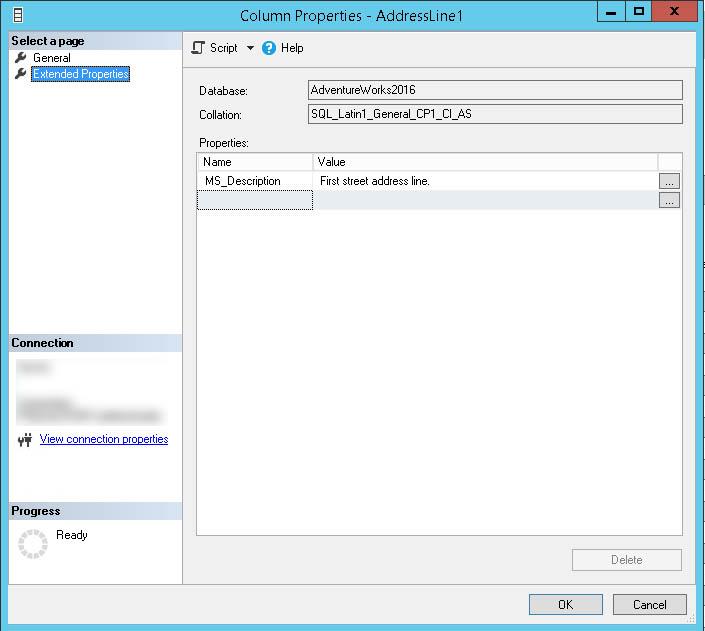
Once we have discovered the columns that contain personal data, the next step we must take is to classify them according to the type of data they store, for this we have the Extended Properties of the columns.
The Extended Properties are available from SQL Server 2008 and it is a way to add a description or a classification to each column, in order to access those features we will only have to press the right button on a column and click on properties.
Now you are at that moment that you think that if you have to do this column by column you will take a century, but do not be alarmed, there is a solution that will make this process much faster and even a little automated and that is available from version 17.5 of SQL Server Management Studio.
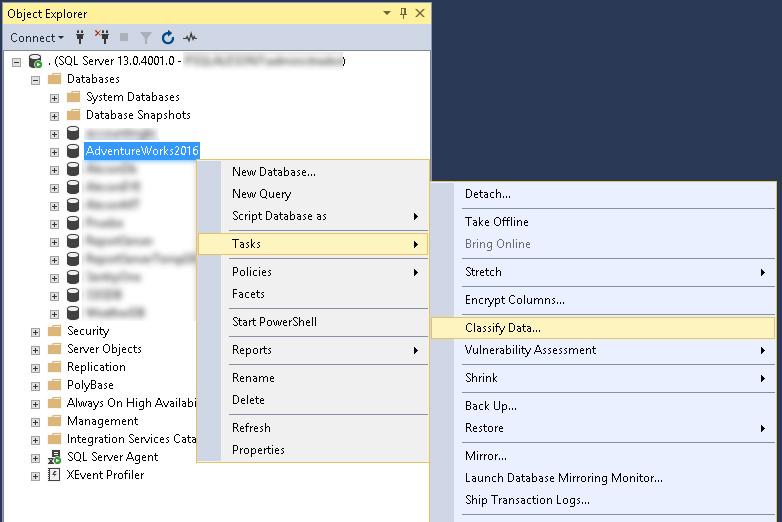
We can access this option by right clicking on a database->Tasks->Classify Data…
Just open it, and automatically we will make a recommendation for the classification of certain columns.

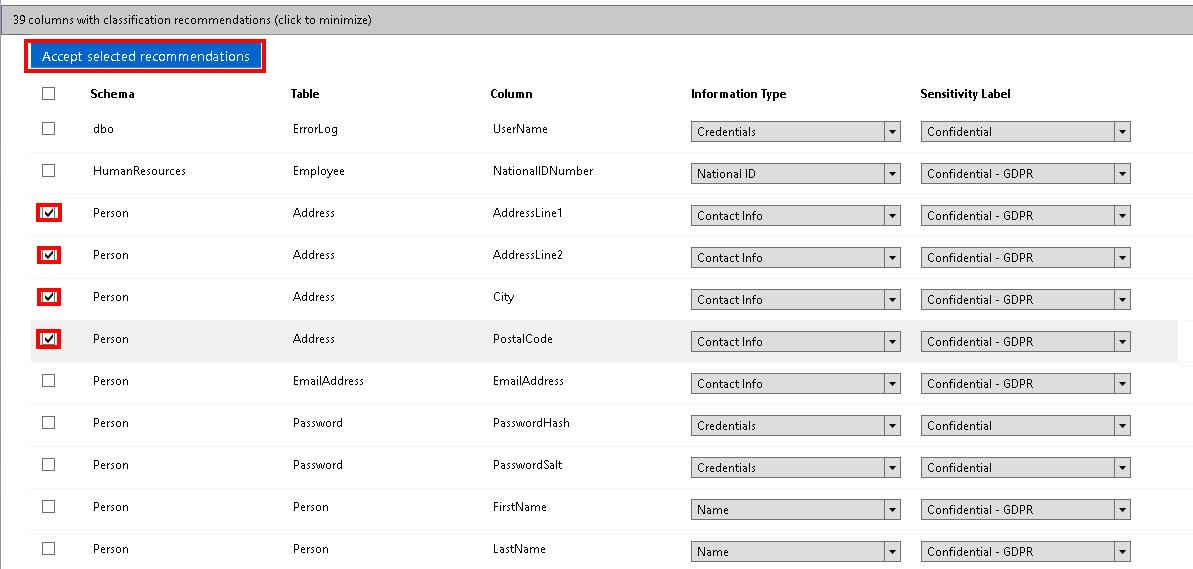
When clicking, the list of columns will appear.
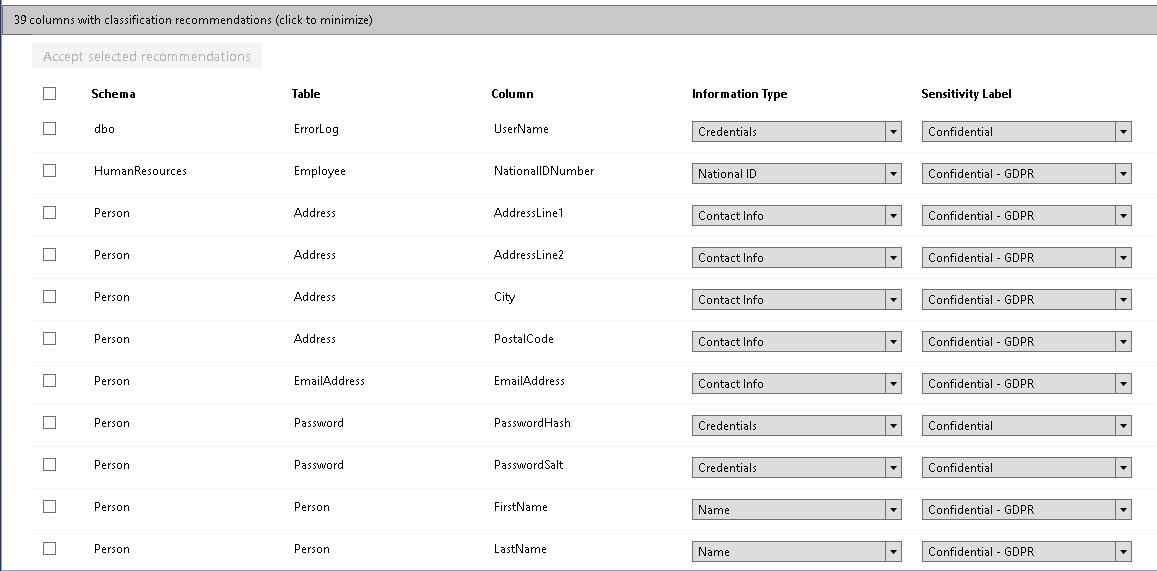
We can select the columns that we want and click on “Accept selected recommendations”. This action will do is add the Information Type and the Sensibility Label to the Extended Properties of the column.
Once we finish with the suggested columns, we will rely on the list that we will have extracted with our script in the discovery phase to classify other columns.

The classification will be done by choosing an Information type and a Sensitivity Label, inside each one we will find the following types:
Information Type:
- Banking
- Contact Info
- Credentials
- Credit Card
- Date Of Birth
- Financial
- Health
- Name
- National ID
- Networking
- SSN
- Other
- [n/a]
Sensitivity Label:
- Public
- General
- Confidential
- Confidential – GDPR
- Highly Confidential
- Highly Confidential – GDPR
- [n/a]
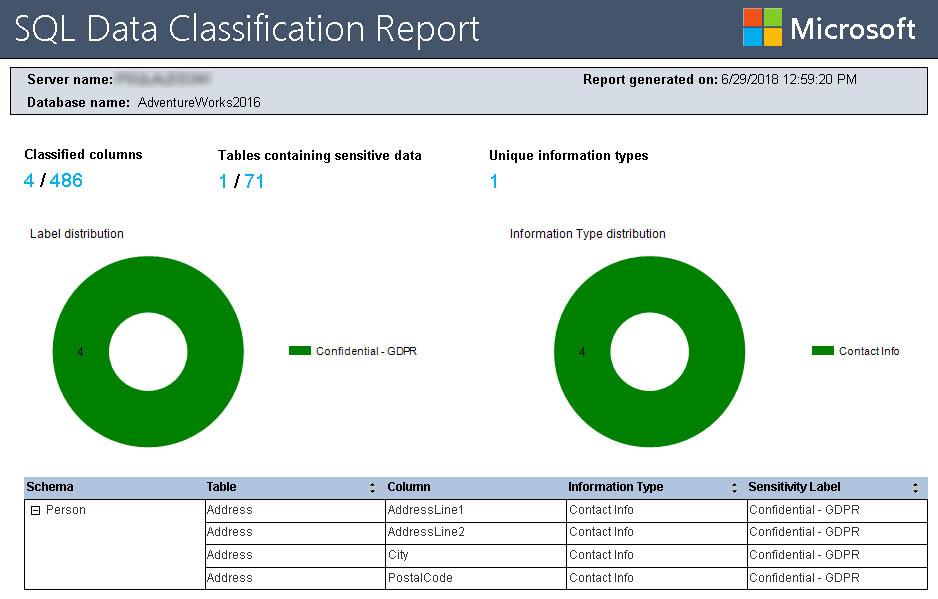
Now that we have discovered and classified our personal data, we can launch a report that shows us statistical data of this classification in a fast way.
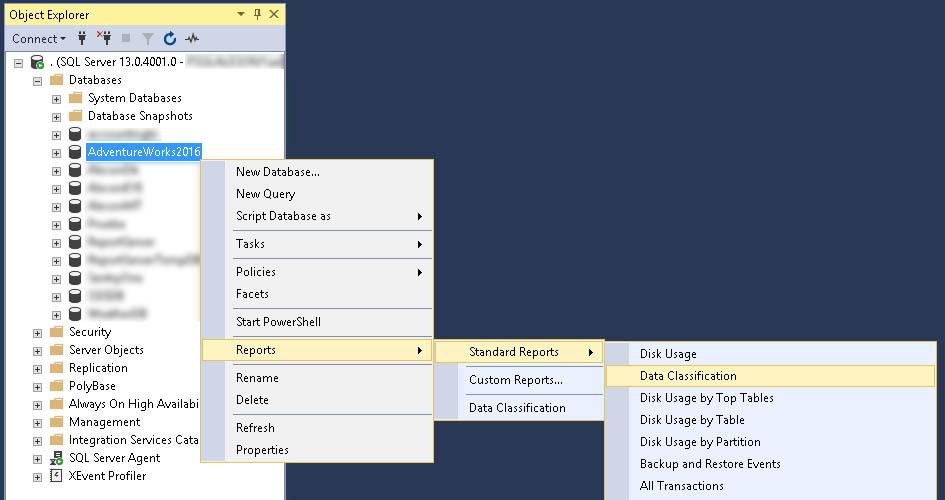
We access this report by right clicking on a database->Reports->Standard Reports->Data Classification
In our case, we will only see in the report 4 columns, which are the ones we had previously marked with the Classify Data tool.
Now that we have all our columns perfectly classified, it’s time to go to the next point of the GDPR and see how to Manage this data.
GDPR Series:
- How to adapt SQL Server to the GDPR
- Discovering and classifying personal data with SQL Server
- Managing access and use of data with SQL Server
- Protecting data at Rest, in Use and in Transit
- Monitor and Report unauthorized access to Personal Data

Working with data technologies since 2008, my main expertise is in SQL Server but I work well as a Data Engineer in Azure Data and in all kinds of databases. Since 2015 I work at Aleson ITC, a company where I am the CTO and also a shareholder.