
Calculated Groups: Reduce the number of measures to your SSAS Model
In today’s post we are going to talk about the Analysis Services Tabular Models, specifically one of the latest news published earlier this year: The Calculated Groups.
The Calculated Groups allow us to shorten the number of measurements we have in an Analysis Services model.
Surely it has happened to all of you that you have finished an SSAS model with 10 measures and when you have delivered it to your client, he has asked you, for example, to compare all the measures with the day, month and year before. Only with this request from the client we have already gone from a model that contained 10 measures, to one of 40, since we should create a new measure with the calculation of the previous year for each measure we had. If we created a group calculated with the calculations of the day, month and previous year, the model would still have the initial 10 measurements.
Functioning
First, I am going to show you how to perform this new functionality.
The internal operation of the Calculated Groups is based on dynamically taking the measurements that we have in the model in the current context and applying all the calculations that we indicate within the calculated group. To make all this possible, the number of functions in DAX has been expanded:
- SELECTEDMEASURE: Reference the measure to which the calculation will be applied.
- SELECTEDMEASUREFORMATSTRING: Returns the format of the measure.
- SELECTEDMEASURENAME: returns the name of the measure.
- ISSELECTEDMEASURE: indicates with a boolean value if the measure is within a list of measures.
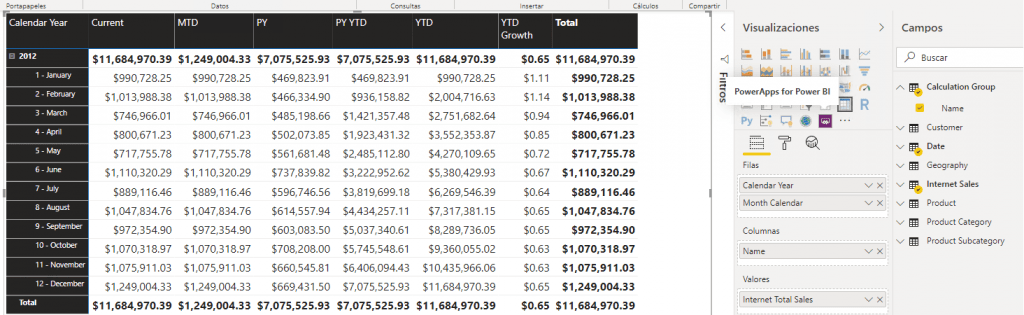
Even though it’s a spoiler to show the final result right now, I think it will help you understand how calculated groups work faster.
- Starting from the following table with the Calendar Year columns for Internet Total Sales.
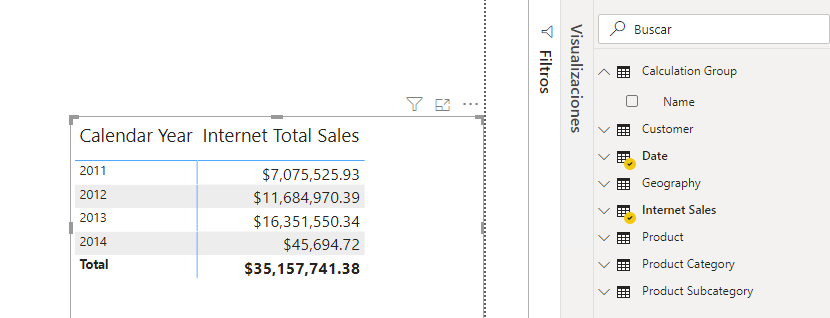
- We add the calculated group that later I will teach you how to create.
- As you can see, the following columns have been added with their respective calculations: Current (value of the selected measure), MTD (month to date), PY (previous year) …
Creation of the Calculated Group
Now yes, we are going to learn how to create the Calculated Group.
Starting from a complete SSAS Tabular project, we proceed to create a new calculated group and as you see in the following image the group creates us and by default, a folder called Calculation Items. This folder will contain all the calculations that we want to add and a column called Name that is the one that we will remove in the Power BI or Excel visuals.

As we see, I do not use Visual Studio to develop SSAS Tabular projects, since, since I tried Tabular Editor I am delighted (Here is an entry where I teach you how to use it), it works immensely better than Visual Studio and in fact, since They have confirmed that they will soon implement it together with VertiPaq Analycer within Power Bi Desktop.
Now we will proceed to create the Calcutation Items that I showed you in the table in Power Bi Desktop. To create them we simply place ourselves in the calculated group that we have created and right click New Calculation Item.
Below I describe and leave you the code of all the Calculation Items created.
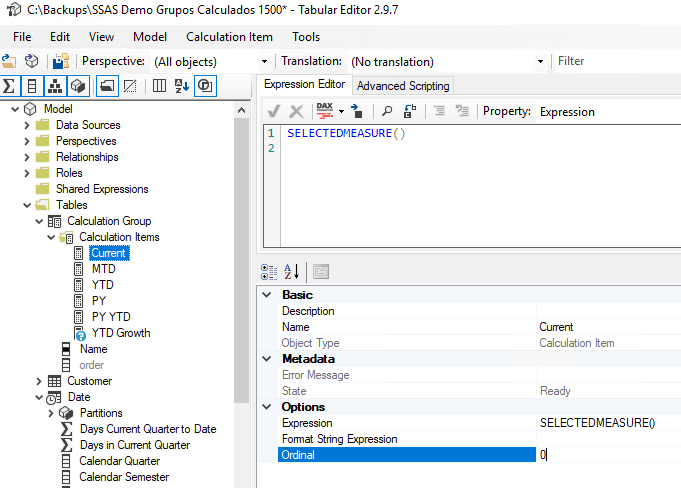
- Current: will return the value of the measurement without applying any calculation.
SELECTEDMEASURE()
- BAT: will return the value of the measurement of the month to date.
CALCULATE ( SELECTEDMEASURE (), DATESMTD ( 'Date'[Date] ) )
- YTD: will return the measurement value for the year to date.
CALCULATE ( SELECTEDMEASURE (), DATESYTD ( 'Date'[Date] ) )
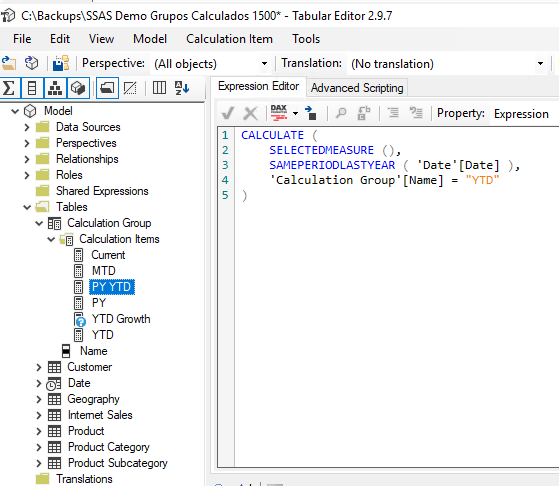
- PY: devolverá el valor de la medida en el mismo periodo seleccionado pero del año anterior.
CALCULATE ( SELECTEDMEASURE (), SAMEPERIODLASTYEAR ( 'Date'[Date] ) )
- PY YTD: devolverá el valor de la medida del año hasta la fecha pero del año anterior.
CALCULATE (
SELECTEDMEASURE (),
SAMEPERIODLASTYEAR ( 'Date'[Date] ),
'Calculation Group'[Name] = "YTD"
)
- YTD Grouth: devolverá el porcentaje de mejora respecto al año anterior.
VAR _YTD =
    CALCULATE ( SELECTEDMEASURE (), 'Calculation Group'[Name] = "YTD" )
VAR PY_YTD =
    CALCULATE ( SELECTEDMEASURE (), 'Calculation Group'[Name] = "PY YTD" )
RETURN
    DIVIDE ( _YTD - PY_YTD, PY_YTD )
Simply by having a basic understanding of DAX, everyone can do it.
Properties
Within the calculated groups there are two properties that are very useful:
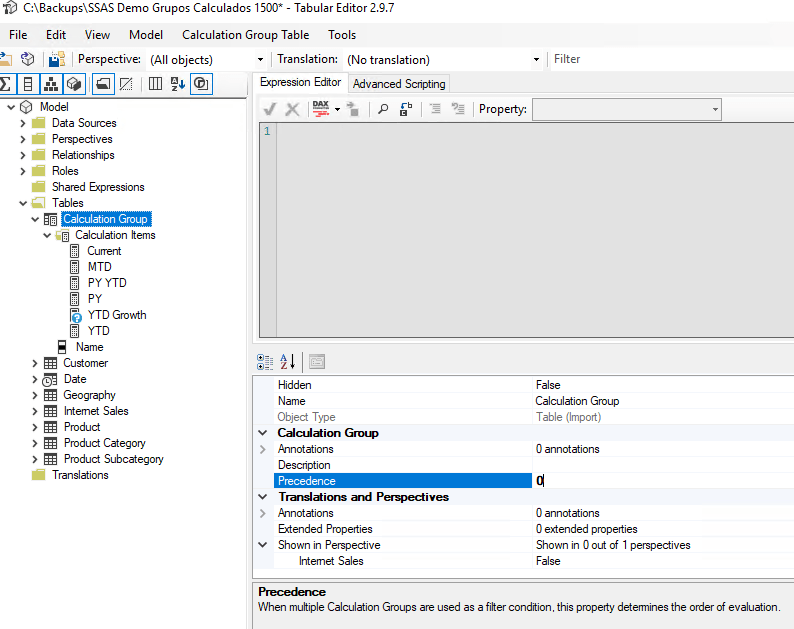
- Precedence: determines the evaluation order when there is more than one calculated group. The less Precedence you have the sooner it will be evaluated.
- Ordinal: establishes the order of the Calculation Items. By default, it will order them alphabetically but if we want to order them in a specific way we can do the following:
- We create a new column, we specify that it is of type Integer and we hide it since we are only going to use it for the ordering of the Calculation Items.
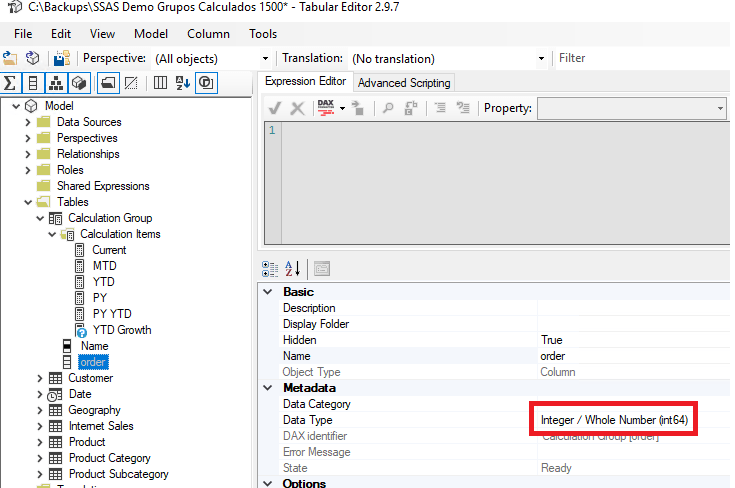
- Now we can indicate the Ordinal property for each of the Calculation Items. Sorting starts from 0.
Specifications Prior to the Implementation of the Calculated Groups
Being a very recent technology, it works in SQL Server 2019 and later versions of Analysis Services, Azure Analysis Services and Power BI Premium, so it works on tabular models with a compatibility level of 1500 or higher.
Note that both row level security and object level security do not work with calculated groups. They will work with the rest of the project but not with the calculated groups.
I hope it has helped you and I wait for you in my next posts.
If you want us to help your business or company contact us at info@aleson-itc.com or call us at +34 962 681 242
Business Intelligence Expert Consultant. Specialising in creation of Data Warehouse, Fabric, Analysis Services, Databricks, Power BI, SSIS and SSRS.