
Incremental Refresh & Real Time with Direct Query in Power BI

Welcome to the best Data & Cloud blog. In today’s post, we’re going to talk about Hybrid tables: Incremental refresh & Real-time with DirectQuery. Let’s get started!
The Power BI updates in May have come with a lot of new features. But the main news this month is Microsoft Fabric, which we will discuss in future articles because now it’s still on preview
However, today, I want to emphasize a new and very interesting functionality, the Hybrid tables.
Hybrid Tables
Hybrid tables are a partitioning feature that allows us to use both Import mode and DirectQuery mode in the same table. With this feature, we can improve the performance of our solutions by storing our historical data in Import mode partitions while having real-time updates for our most recent data by querying it in DirectQuery mode.
In the following image, we can see an example of partitioning where the archived data is highlighted in green, indicating that it will only be updated the first time we load the dataset. The data highlighted in yellow represents the data that will be loaded in each refresh executed either through scheduling or manually. The data highlighted in red represents the current data that is progressively loaded.

¡IMPORTANT!
Real-time data refresh with DirectQuery is only available in Power BI Premium, Power BI Premium per User, and Power BI Embedded.
Alright, without further ado, let’s get started with the “How It’s Done!”
Incremental Refresh & Real Time
Let’s imagine that we have a sensor that recurrently inserts the following information every 2 seconds into SQL Server: “insertion_date” and “value”.
To recreate the sensor, I have created the following script in SQL Server where you will first load the historical data, and then execute the stored procedure whenever you want to emulate the sensor.
/****** PASO 1: CREAT TABLE ******/
IF  EXISTS (SELECT * FROM sys.objects WHERE object_id = OBJECT_ID(N'[dbo].[table_incremental_refresh__realtime]') AND type in (N'U'))
DROP TABLE [dbo].[table_incremental_refresh__realtime]
GO

SET ANSI_NULLS ON
GO

SET QUOTED_IDENTIFIER ON
GO

CREATE TABLE [dbo].[table_incremental_refresh__realtime](
	[id] [int] IDENTITY(1,1) NOT NULL,
	[date_insert] [datetime] NOT NULL,
	[value] [int] NOT NULL
) ON [PRIMARY]
GO

ALTER TABLE [dbo].[table_incremental_refresh__realtime] ADD  DEFAULT (getdate()) FOR [date_insert]
GO

/****** PASO 2: INSDERT HISTORI ******/
--NECESITARIS LA CREACION DE LA TABLA DIMDATE, PODEIS ENCONTRAR EL SCRIPT EN OTRAS ENTRADAS DE ESTE BLOG
INSERT INTO [dbo].[table_incremental_refresh__realtime]
select date,cast(RAND()*1000 as int)
from [dbo].[DimDate] where date<getdate()

/****** PASO 3: CREATE AND EXECUTE PROCEDURE ******/
CREATE procedure [dbo].[sp_insert_table_realtime]
as

declare @a as  datetime
set @a=dateadd(MINUTE, 100,GETDATE())

while GETDATE()<@a
begin

INSERT INTO [dbo].[table_incremental_refresh__realtime]
           ([value])
     VALUES
           ( cast(RAND()*1000 as int))

WAITFOR DELAY '00:00:02';

end

GO


EXEC [dbo].[sp_insert_table_realtime]
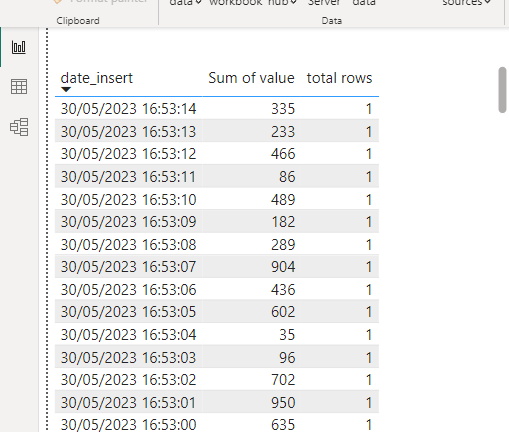
Once we have our data source created, emulating a sensor, we can proceed with the creation of our Power BI report. To do this, we open Power BI Desktop, choose SQL Server as the data source, and add the necessary data to establish the connection.
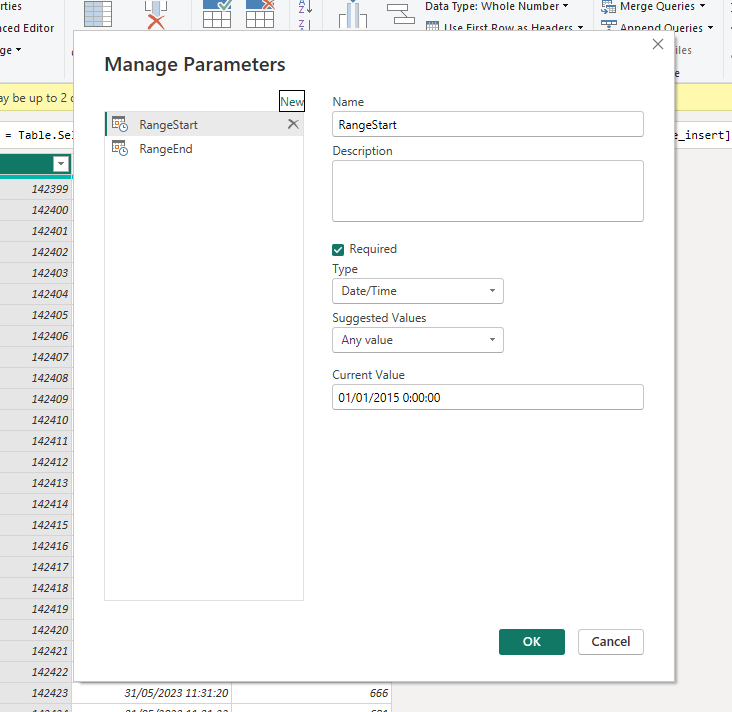
After loading the data into Power BI Desktop, as we can see in the previous image, we will proceed to create the necessary parameters for incremental refresh.
Incremental Refresh
These parameters will be initially used to filter the data based on a date field or a date field formatted as an integer. To do this, we go to “Manage Parameters” in Power BI Desktop and create the “RangeStart” and “RangeEnd” parameters.
Next, we navigate to the table where we want to implement incremental refresh and select the date column where we need to apply filters with the parameter values, as shown in the following images:
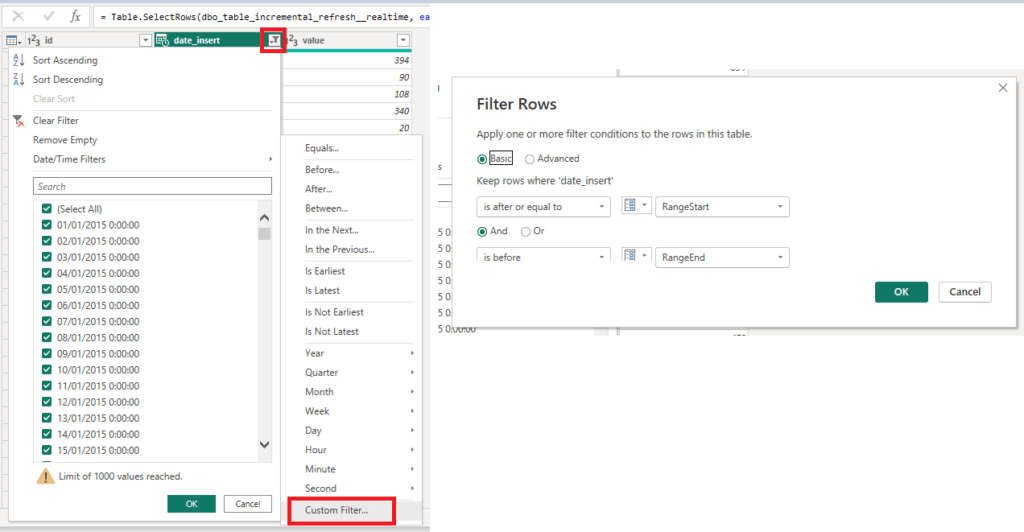
We apply the changes, and the dataset will be refreshed with the filters we have applied.
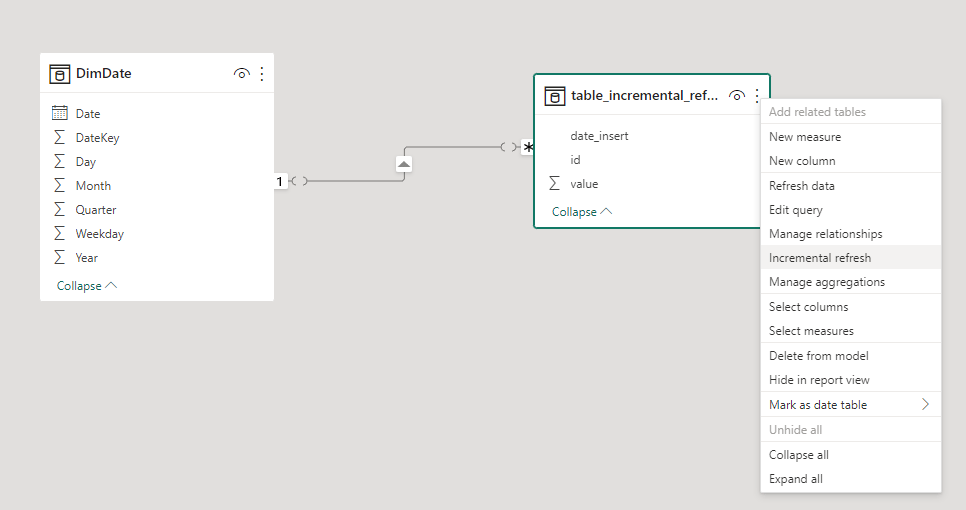
Now, we open the “Model View” and proceed to configure the Incremental Refresh.
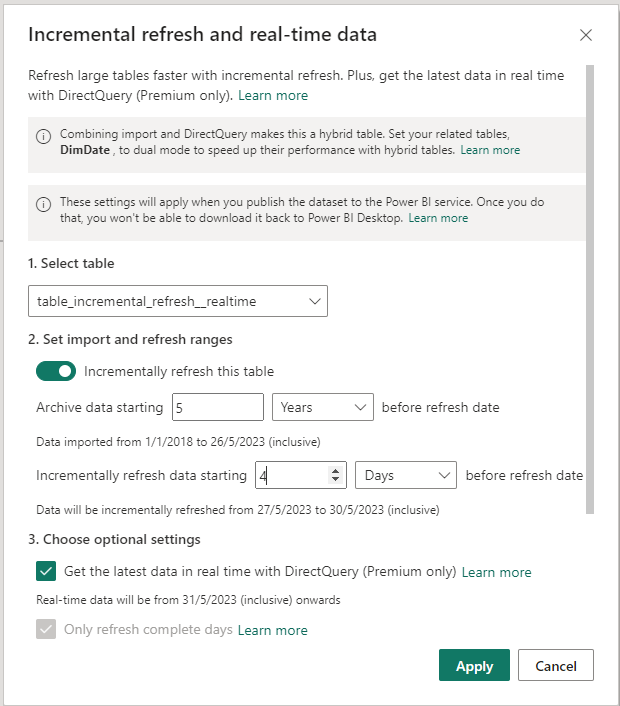
We enable Incremental Refresh for the relevant table and indicate that we will keep the last 5 years of data archived. We also specify that the incremental refresh should be performed for the last 4 days. This means that the first time we publish the Power BI report, the entire dataset will be processed, and the last 5 years will be archived, assuming that they won’t be modified later on.
Also, we must indicate in the Incrementally refresh data starting part, 4 days after the date. For data refresh, this means that in the scheduled refresh that we set according to our preferred schedule (once a day or every 8 hours, as suitable for the business), only the data from the last few days will be updated.
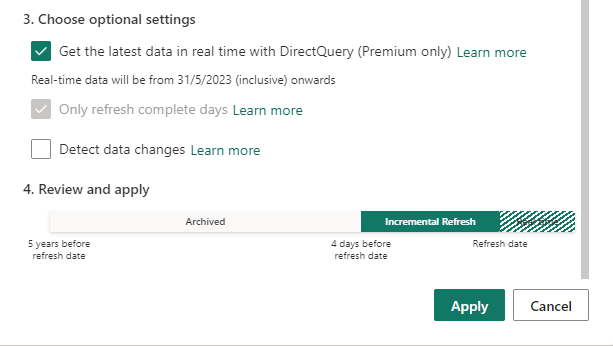
You activate the “Real-time with DirectQuery” option, and a summary image appears, showing information about the Archived part, incremental refresh, and the real-time part. You click on “Apply” to save the configuration.
Visualization in your Workspace
We deploy the project, and we will see the option to select only Workspaces with Power BI Premium, Power BI Premium per User, and Power BI Embedded. We upload the project, and then we can view it in Power BI online.
Once the solution is uploaded to the Workspace, in our case, a Power BI Premium per User capacity, we can take the URL of the Workspace and open Analysis Services from our Management Studio.
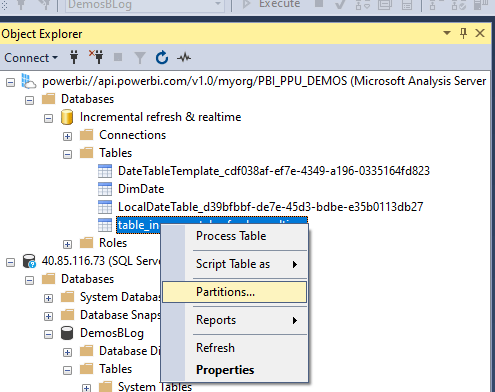
We open the partitions, and we can observe all the partitioning that has been automatically created for us.
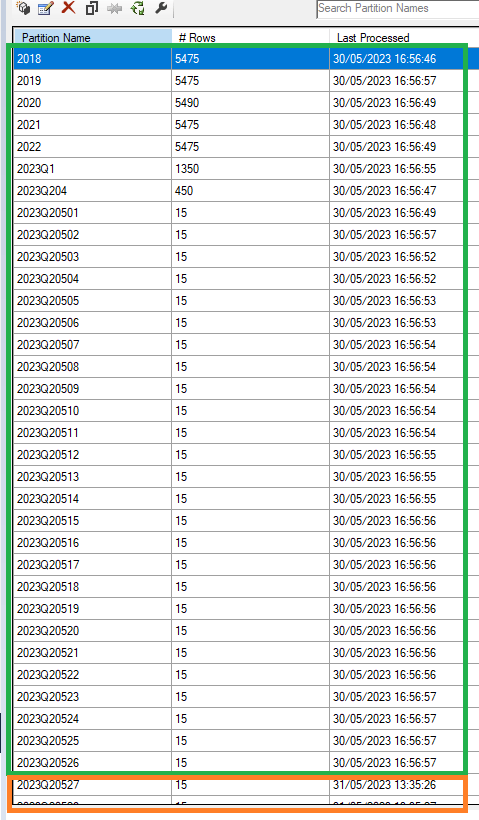
In this first image, we can see the green partitions representing the Archived data from the last 5 years.
Meanwhile, in the orange-colored box, the date changes to the next day, representing the incremental refresh partitions.
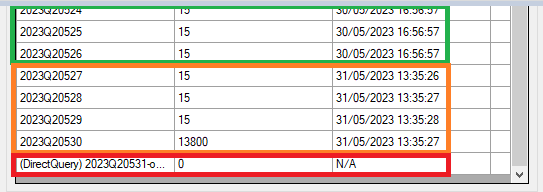
In this image, we can see the orange partitions representing the 4-day incremental refresh and the red data for April 31st, which is being refreshed in real-time through DirectQuery.
Previously, we will need to install a gateway on the server where our SQL Server is located to establish connectivity with the Power BI service. I’ll leave a photo of the Lineage View.
As you can see in this video, the data is updated every 2 seconds. This needs to be configured by editing the report from the Power BI service. Click on “Edit” and then click on any object. You will see the following panel where you can find “Page Refresh” option.
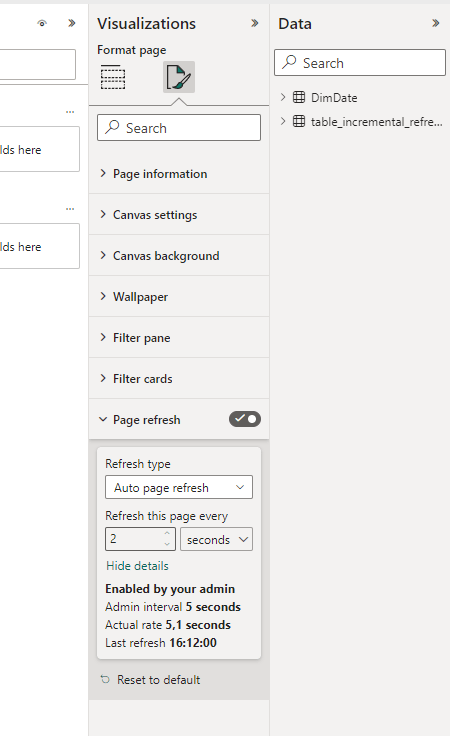
In our case, we configure the visualizations to refresh every 2 seconds.
By default, it is configured by the Capacity Administrator with a minimum of 5 minutes. Even if we set it to 2 seconds, it will still refresh every 5 minutes. This is because refreshing every 2 seconds can result in a very high resource consumption.
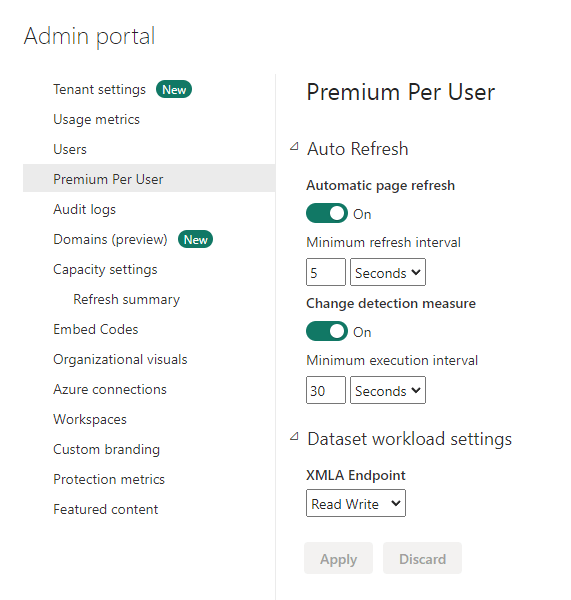
If we want to modify this parameter, we can go to the gear icon in the top right corner and select Admin Portal. From there, we can make the necessary modifications according to our preferences.
And that’s it! I hope this information has been helpful to you. If you found it useful, we recommend checking out our latest posts:
Ledger for SQL Server 2022
How to Configure pgbackrest in PostgreSQL to back up to Azure
6 Fundamental Steps for Efficient and Successful Project Management
If you need help with your Data projects and are interested in visualization through Power BI, Aleson ITC can help you.
Business Intelligence Expert Consultant. Specialising in creation of Data Warehouse, Fabric, Analysis Services, Databricks, Power BI, SSIS and SSRS.